

After making those first two pouches in June and seeing how much my daughter liked hers, I knew I needed to make something similar for some women in my family. I set my goal for the end of July, when we would be getting together with my husband’s family on one weekend, and most of my family the next weekend. I decided I wanted to make a slightly smaller pouch, like a coin purse size, and push myself to be creative using the scraps and bits I had on hand. It was a very fun process. I know you would love it too!
Still feeling like a beginner at the pouch making, I wanted to have a pattern on hand to use as my crutch through the process. I came across a free tutorial from Clover & Violet called “Ruffle Coin Purse.” The tutorial has tons of pictures and excellent instructions. (Thank you ladies for being my crutch!) You will want to check out the Clover & Violet website. They have fabulous bag patterns in all shapes and sizes!
Coin Purse Crazy
Pictured below is the first coin purse I made. You will see that I didn’t do the ruffle. I really wanted to make patchwork coin purses in different designs. But I still followed Clover & Violet\’s “Ruffle Coin Purse” as my guide. (At the bottom of this post I will include a few notes on how I deviated from their pattern.)
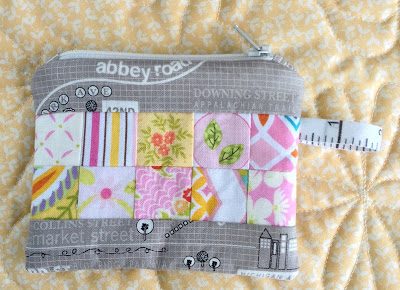

For the second coin purse, I wanted to show off more of the main fabric, so I used three slightly bigger squares of fabric instead of ten tiny squares and added a button just for fun.

After these two coin purses were completed, I was hooked. At that point I began making myself little kits to sew up when I had time. This may have been the most fun part of the process . . . rummaging through scraps, pulling them together, cutting, and laying them out for later assembly. I frequently called my daughter over to show her the latest coin purse kit and get her feedback. She is such a good sport, and she has a very good eye!


The first coin purse took me about an hour and a half to make, but I was taking my time, making notes on my measurements, and mentally preparing to make more. The remainder of the coin purses went much faster and the end result was so satisfying that I know I will make more in the future. In fact, I have a little list of people I need to make them for!


 |
| I omitted the bottom horizontal piece on this front. That little camper was just too cute to cut into! |


Last weekend I was happy to hand out my treasures to the ladies in my husband’s family, and I will be passing out more this weekend when I see my mom, sister and nieces. I also shipped one off to my cousin’s wife, who is not a quilter, but is dear enough to read my blog and encourage me through her kind words. While I’m pretty sure these women will enjoy their little gifts, it brought me so much happiness to make them for people I love that it seems like I am the true winner in the situation. This is one of the reasons that we makers make, isn’t it?


Thanks for reading! Here’s hoping you get carried away quilting often!
~Taunja
How I customized my coin purses:
(Again, many thanks to Clover & Violet for the tutorial!)
- I modified the size to be 5 1/2\” by 4 1/2\”. (My non-mathematical brain found it easier to divide the front into sections if it was 4 1/2 rather than 4 1/4 as was indicted on the Clover & Violet tutorial. Please don\’t laugh.)
- Every coin purse front has a top and bottom solid horizontal piece measuring 5 1/2\” wide by 1 1/2\” tall. That would leave a a middle horizontal section which needed to end up 5 1/2\” wide by 2 1/2\” tall. There are many options for this middle section:
- a solid piece measuring 5 1/2\” wide by 2 1/2\” tall
- (10) 1 1/2\” pieces sewn together in two rows of 5, creating a 5 1/2\” by 2 1/2\” piece
- Any number (3, 4, 5) vertical pieces that are 2 1/2\” tall, and when sewn together into a strip, become 5 1/2\” wide.
- And any other terrific combinations you might come up with!